This is the second part of the JavaScript blog post series that will take you from beginner to advanced. By the end of this series you will know all the basics you need to know to start coding in JavaScript. Without further ado, let’s get started with the second tutorial.
JavaScript basics – table of contents:
In this blog post we will continue with where we left from the first blog post. At this stage you should have your Google Chrome browser open and more specifically have your JavaScript console open. If you for some reason closed them, it would be a good time to open them back up. Let’s start learning JavaScrip basics
If you are on a Mac, the keyboard shortcut to open up the console is to press “option + command + J”, after you open up Chrome. If you are using a Windows device, you can use the keyboard shortcut of “Control + Shift + J”, to open up the JavaScript Console, once you open up Chrome. Or you can also go to the menu at the top and go to View -> Developer -> JavaScript Console.
JavaScript basics
JavaScript, like all other programming languages, is a language you use to communicate with computers. Like a natural language has grammar and known words to form proper sentences, programming languages also has certain rules you should follow to effectively communicate with the computer.
For example certain words mean certain things to the JavaScript engine that runs our code, such as the “alert” keyword we used in the previous tutorial had meaning of display an alert to the user with the specific words that they put inside the parentheses rigth after. In our case, we wrote “Hello, World!” so we got an alert that said “Hello, World!”.
There are also other reserved keywords in JavaScript that we should be aware of so that we can effectively communicate with the computer using the right words and grammar. Also just like the grammar we have in natural language, there is also a grammar in programming languages. That grammar is commonly called the “syntax” in programming languages and JavaScript is no exception to this. That’s why it is a good idea to understand the main keywords and the grammar we have in JavaScript as we start learning about JavaScript basics. Let’s see some of the main things we should know about JavaScript.
Line by line execution
When it comes to JavaScript basics, one of the first thing you should know ais that the code you write will be executed line by line, from top to bottom. This style of code execution is also referred to as JavaScript being an “interpreted programming language”.
On the contrary some programming languages are “compiled programming languages”. Some examples to compiled languages would be: C, C++, C#, Swift, Java and so on. The main difference is that with compiled programming languages, all the code you write will be “compiled” and will be executed in one piece by the computer. Thats also why it can be harder to start learning a compiled programming language as it can be harder to spot where you made an error in your program.
Some examples to interpreted programming languages would be JavaScript, Python, Bash and Matlab. With interpreted programming languages you have the inherent benefit of seeing what line you made the error, for example forgetting a semicolon or not matching parentheses in your code. Having this characteristic may mot make a large different in certain applications, but when we are trying to load a website with a slow internet connection, you prefer to have every single line of JavaScript to be executed as fast as possible.
Two ways to end instructions
A computer program at the end of the day is a bunch of instructions to the computer. But where does one program ends where does the next instruction starts? There are different approaches to this problem. JavaScript uses two main things, the semicolon and brackets.
Depending on the type of instruction we write, we will generally use either one to end or package a set of instruction. We will use different type of parentheses for different functionalities and data types. For example, in the alert(“Hello, World”); code that we previously executed, the parentheses that surround the hello world writing tells the computer what the alert should say, and the semicolon at the end of the instruction tells the computer that, this instruction ends here, you can move to the next instruction. This is very similar to how we use a period “.” to end the sentences in English.
Comments
Adding comments to the code is an essential part of programming. It may be easy to understand what code you write as you are writing it, but depending on the complexity of the code you may have very little idea six months down the line, when you get back to the code.
Adding comments not only makes it much easier to understand your code for the future you, but it also makes it much easier for anyone that you work with to understand the code as well. It can also help you better develop your understanding about the problem you are working with, since usually it is much easier to solve problems by dividing them into smaller bite size chunks. The commented parts of your code will be ignored by the interpreter and will not be executed.
There are two ways you can add comments is JavaScipt. First one is to add a simple “single line” comment with two forward slashes like this:
// this is a comment
This way whatever you write after the two forward slashes will be ignored on the specific line that you put the forward slashes. You can repeat this as many times to have multiple lines covered with comments like this:
// this is a comment.
// this is another comment.
// you can keep commenting like this.
Another reason why we use comments is to comment out a piece of code to experiment with code. For example you can write the same functionality in multiple ways and you may want to comment one version of the same code to compare their individual performance or results. Let’s see that with an example as well.
Go ahead and copy and paste the following code to your JavaScript console you opened at Chrome.
// greet user
alert("Hello, User!");
alert("Hi, User!");
If you want extra practice writing the whole code yourself you can do that as well. One thing you should know about writing multiple lines of code in the console is that to get to the next line without executing it you can press “shift + enter” to do that. Otherwise after writing a single line of code, if you hit just enter, it will run that line of code. In this example, this is not a big issue and it is actually fine to execute it line by line as well, because we have a simple example that can also work in that style.
After either copying and pasting it or writing the code yourself, go ahead and hit “enter” to run the code. The result should give you two separate alerts. Also to dismiss the alerts you can click “OK”, in this case they wont do anything because this is a simple alert and it does not trigger anything after showing the message we want to display.
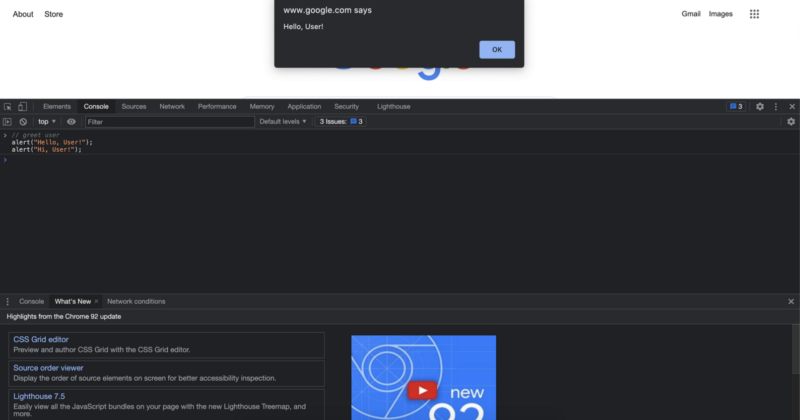
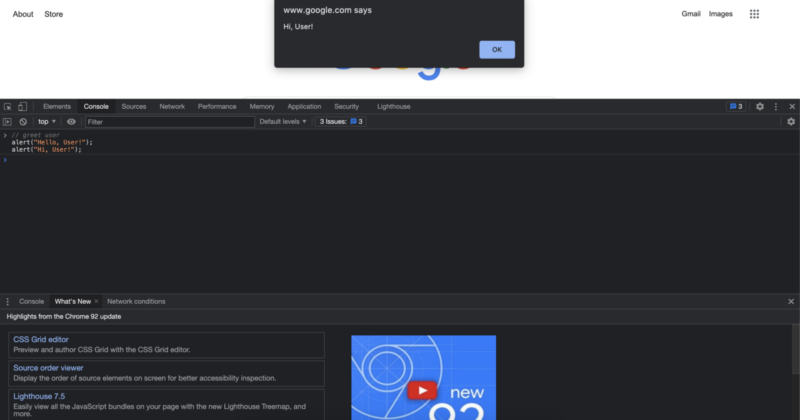
When we executed the code like this, we are executing the same functionality twice. But what should you do if you want to see only one implementation at a time? Well, you know exactly what to do in this case because we already talked about it. Go ahead and comment out one of the lines after pasting or writing out the code so that only the second implementation of “Hi, User!” gets executed.
Once you complete the challenge, or if you get stuck during the challenge you can see the solution code to the challenge below. Before taking a look at the solution, I always highly recommend trying it out yourself as you will learn the best when you really practice it out. If you completed the challenge successfully you should be looking at a screen like this:
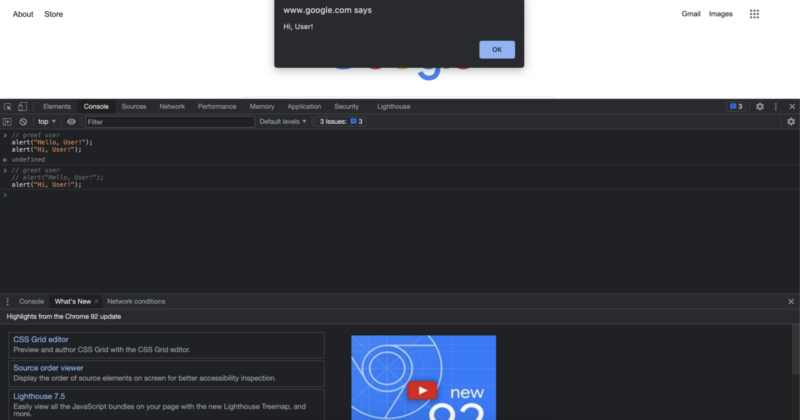
Note that when you comment out a line of code it turns into the same color as the previous commented line. This color difference is here does not actually makes a difference to the computer, but it is a rather helpful feature for us when we are writing code. This way it is much easier if you mistakenly comment out a line of code as the colors will make it obvious.
Another way of commenting code is with the use of the forward slash and the asterisk character. This way we can create single line or multiline comments in our code.
/* a single line comment */
/* the commenting starts when we put a forward slash and an asterisk
and the commented areas ends
when we close of the comment with an asterisk and the forward slash
like this */
Now you know the JavaScript basics. In the next tutorial, we will see an extremely common concept in programming called “variables” along with basic data types in JavaScript.
Author: Robert Whitney
JavaScript expert and instructor who coaches IT departments. His main goal is to up-level team productivity by teaching others how to effectively cooperate while coding.
