Magento is an open-source platform that is ideal for both small and large businesses. Thanks to numerous available modules, you can adjust the functionality to your business type. The popularity of Magento is greatest in the United States, but the European market is also a big part of it. According to statistics, the platform is currently used by about 250,000 customers. If you want to know how to set up a Magento store, read our article.
Magento store – table of contents:
- System requirements and installation
- Configuration
- Store information
- Store appearance
- Required documentation
- Payment methods
- Shipping
- Taxes
- Adding products
- Marketing
System requirements and installation
Before starting the installation, you should read the system requirements, which are shown at this link.
Once all the requirements are met, you need to proceed with the installation. At this stage, Magento has also prepared a guide on how to perform the installation correctly. It can be found at this link.
Configuration
Before you can officially open your store, you must go through the setup process:
- SSL certificate – it is worth taking care about SSL certificate, which guarantees the safety of transmitted data,
- e-mail address – it is a good idea to add an email address to which the seller will receive notifications about new orders, deliveries, invoices, etc.,
- shopping cart configuration – a seller can customize the shopping cart by setting, for example, a minimum order value,
- taxes – check if taxes are correctly configured for your country’s rules,
- shipping – setting the offered shipping methods,
- PayPal – If a merchant decides to offer PayPal payments to customers, they should start by setting up an account with the provider, configuring payment methods, and testing that everything works properly,
- payment – then select offered payment methods and check if they are configured correctly.
Store information
The vendor should add the store details. He/she can do it by going to “Stores” tab” → “Configuration” → “General” → “Store Information“. Here, information such as:
- store name,
- phone number,
- office hours,
- country,
- region/state,
- zip code,
- city,
- address,
- VAT number.
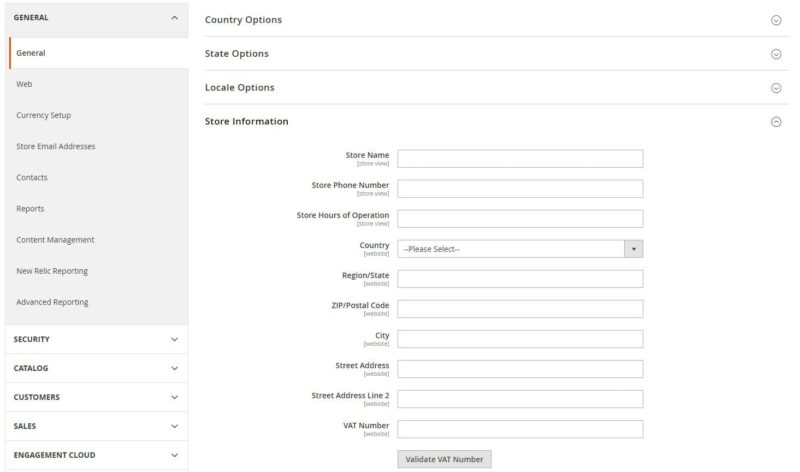
On the same page, in the “Local options” section, select the time zone, language, weight unit, and the first day of the week and the days that mark the weekend.
Magento Store appearance
When creating a store using the Magento platform, you can use free (or paid) templates. Sometimes you may encounter installation problems or the theme will not always work with the latest version of the store. Templates for Magento can be found, among others, at this link.
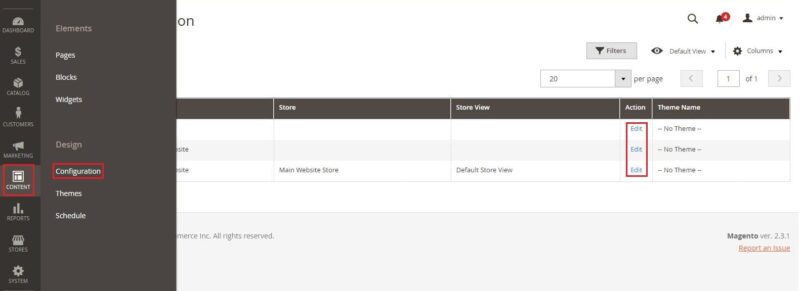
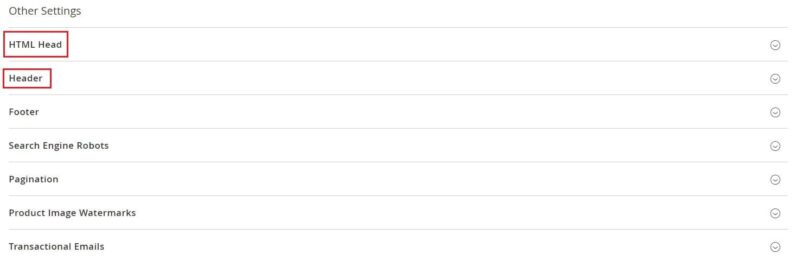
Vendors may upload their logo to be displayed in the page header. Acceptable file extensions are .gif, .png, .jpg, .svg. Logo can be added through the path “Content” → “Design” If you want to add a logo, click the button “Content” → “Design” → “Configuration“, then in the table, select the desired store view and click “Edit“. To edit the logo, click the “Edit” button in the tab“Header“.
Similarly, you can add a favicon, which is a small icon that you can see next to your site title in your browser. Accepted extensions are .png, .jpg, .svg, .ico. Adding a Favicon follows the same path as for the logo but in the “HTML Head” tab.
Required documentation
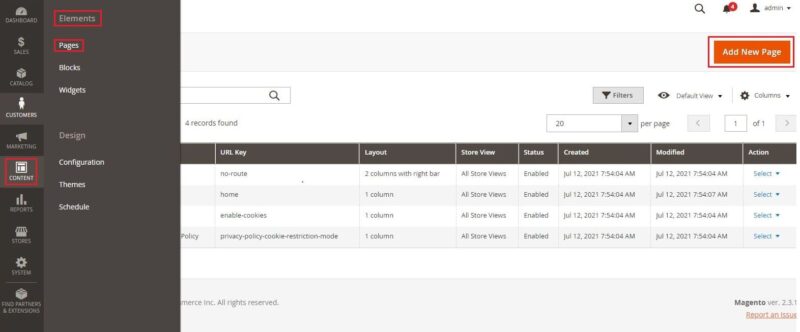
Depending on the country, the seller needs to add the necessary documents on the site, such as privacy policy, cookie policy, payment methods, terms and conditions, etc. To do this, you need to follow the path: “Content” → “Elements” → “Pages” and here fill in the missing documentation.
Payment methods
First, fill in merchant location, which is used to configure payment methods. This is done in the tab “Stores” → “Settings” → “Configuration” → “Sales” → “Payment Methods“.
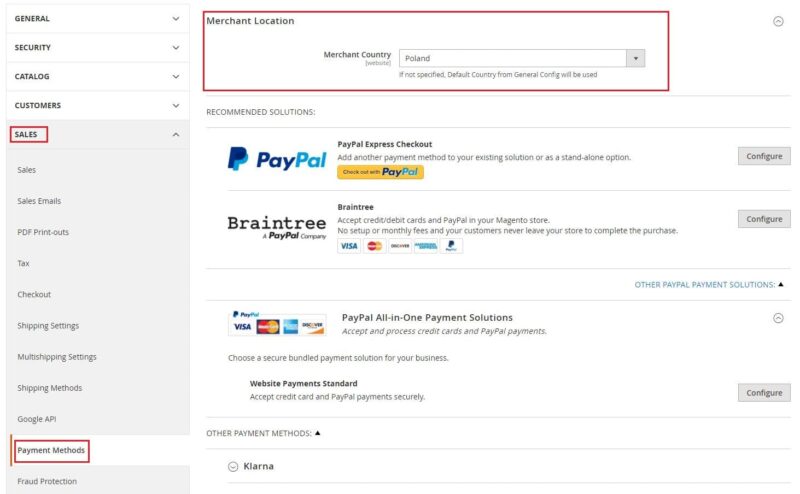
Magento supports various payment methods, both offline (e.g. payment on delivery) and online (e.g. PayPal). To configure the appropriate payment methods, you need to complete the basic information and settings. A detailed guide on how to do it has been prepared by the Magento platform, at this link.
Shipping
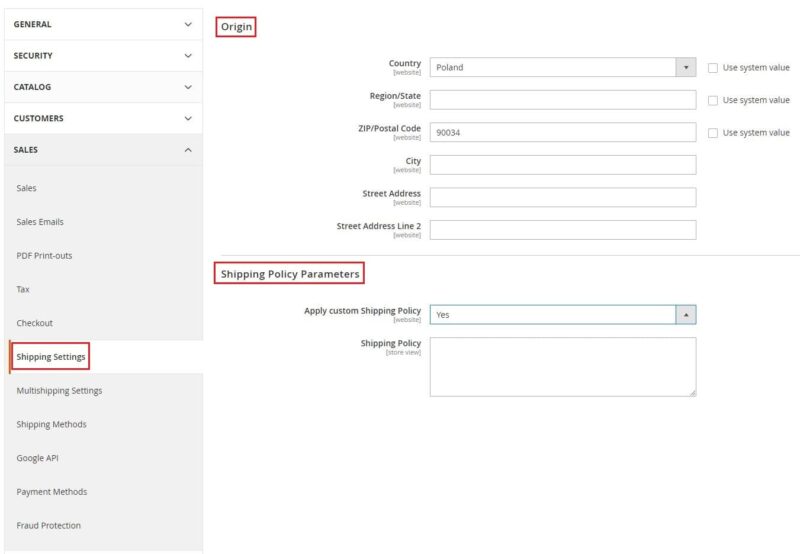
The first step in setting up a shipment is to complete the data in the “Stores” → “Settings” tab → “Settings” → “Configuration” → “Sales” → “Shipping Settings“. Entering the origin information will be necessary when calculating the shipping fee and determining the tax rate. If the seller has a shipping policy, they should include it in the same tab in the “Shipping Policy” field.
The primary delivery methods are:
- Free delivery – offering free delivery can be based on, for example, a minimum order value,
- Flat rate – this is a fixed fee per item (or shipment),
- Rates – the shipping fee is calculated according to a table and after fulfilling a certain combination of conditions, e.g. number of items vs. destination. A detailed explanation of how to configure such a shipping method has been prepared by the Magento platform at this link,
- In-store delivery – this method allows the customer to pick up the purchase on their own at a designated location,
- Dimensional weight – often this method varies in pricing depending on the carrier. It is based on pricing the shipment based on the weight and volume of the package.
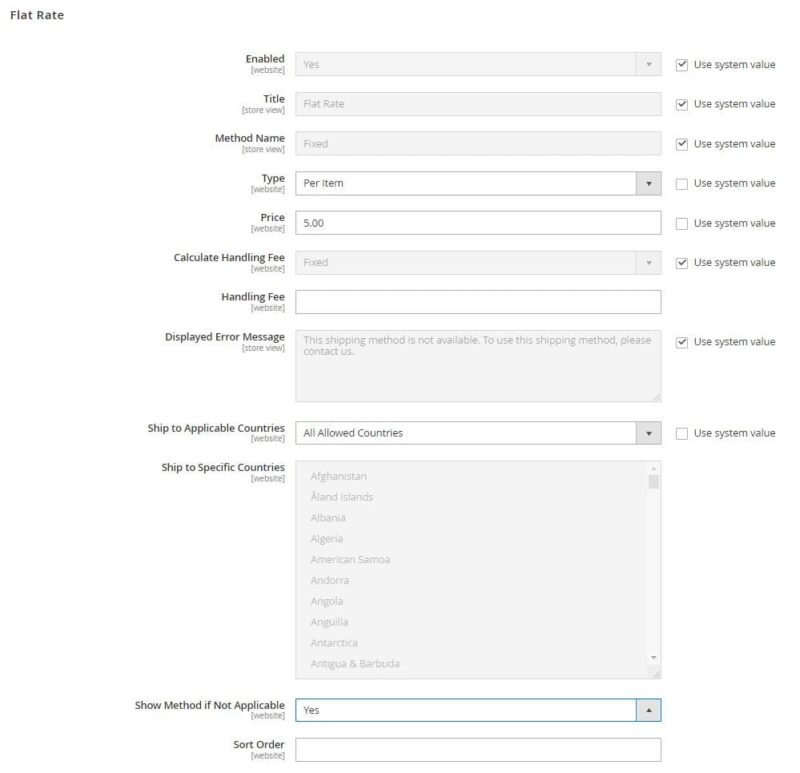
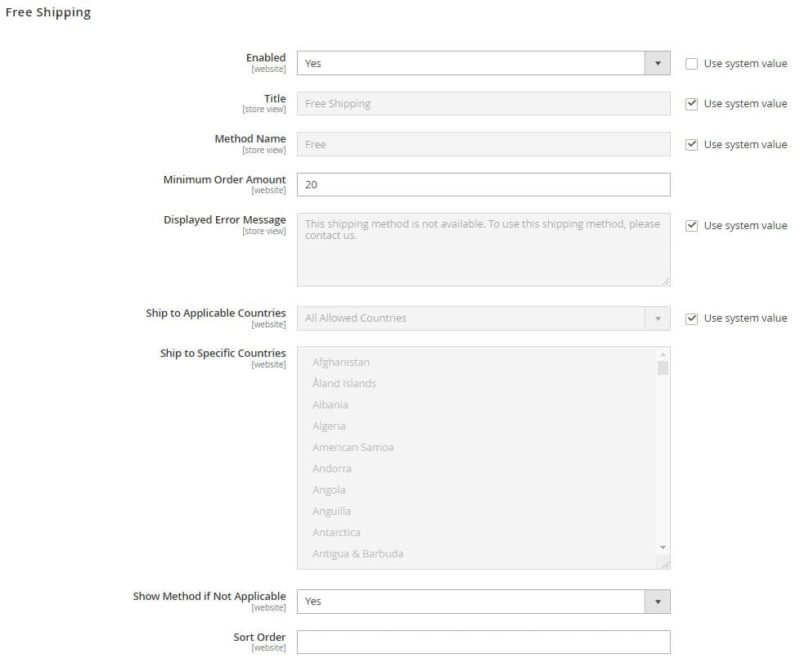
All the above shipping methods can be defined in the tab: “Stores” → “Settings” → “Configuration” → “Sales” → “Shipping Methods“. Also, here you can configure the service of the selected carrier. The seller can choose from: UPS, USPS, FedEx and DHL.
Taxes
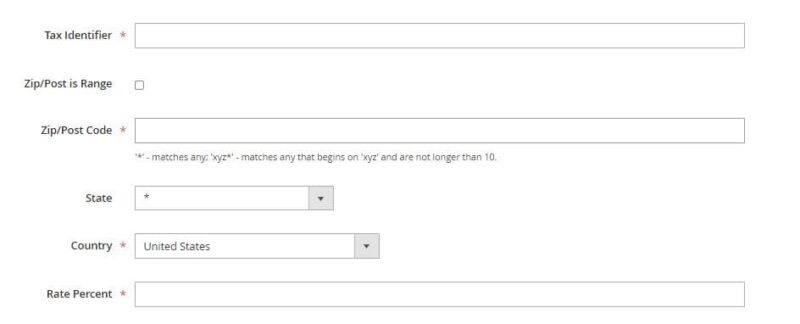
Before launching your online store, you need to configure your tax rates. This is done in the “Stores” → “Taxes” → “Tax Zones and Rates.” Click the “Add New Tax Rate” button to display a window like the one below. You require to fill in such data as:
- Tax Identifier – an identifier for the rate (e.g. 23%),
- Zip/Post Code – the zip codes where the rate will apply, or you can enter “*” in which case the rate will apply to all zip codes,
- Country
- Rate Percentage.
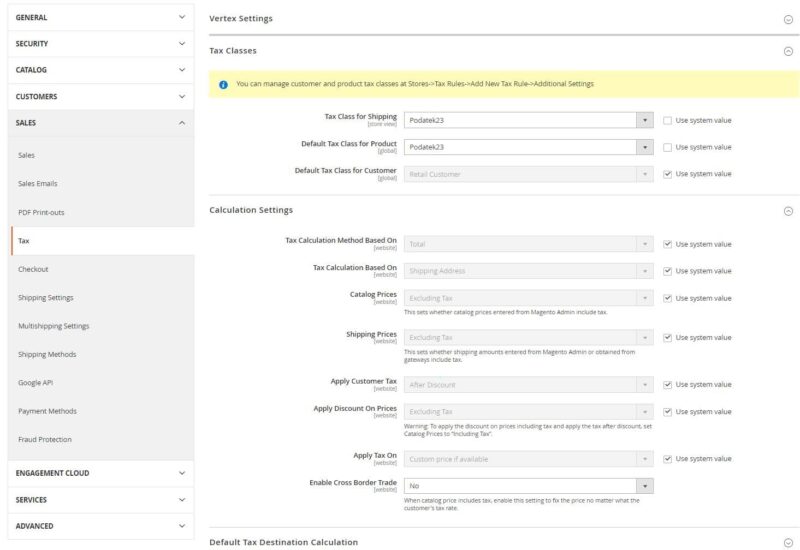
You must also fill in the tax classes, which correspond to whether you need to charge tax on a given transaction. To enter the settings, go through the path: “Store” → “Settings” → “Configuration” → “Sales” → “Tax“.
Adding products
Magento supports several types of products:
- a simple product – the most common form of product that has an individual price and SKU. Such product is available in one configuration only,
- configurable product – it offers several variations of one item,
- A grouped product – a set of simple products. For example, a customer can buy a set of winter clothes (hat, jacket, gloves) at a lower price than they would pay for each item separately,
- virtual product – a product that has no physical counterpart, e.g. a hosting service,
- bundle product – a set consisting of customizable products that are not worth selling separately, e.g. diet catering with individually tailored menus,
- downloadable products – these are products that the client downloads from the server, e.g. e-books, music.

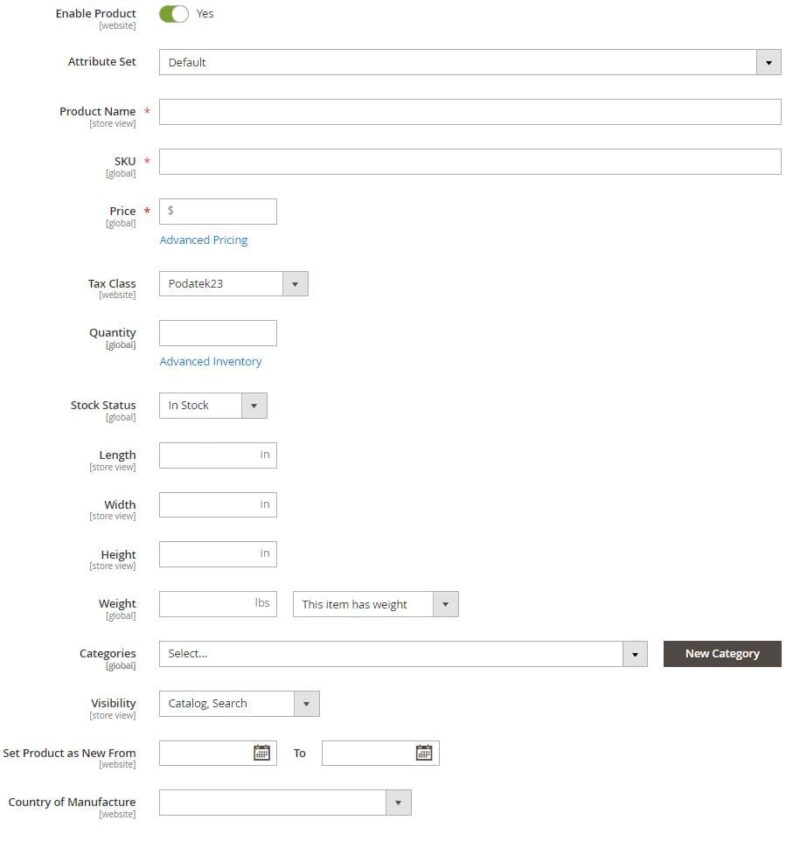
To add a product, go to “Catalog” → “Products” → “Products“, and then press the button located in the upper right corner with the words “Add Product“.
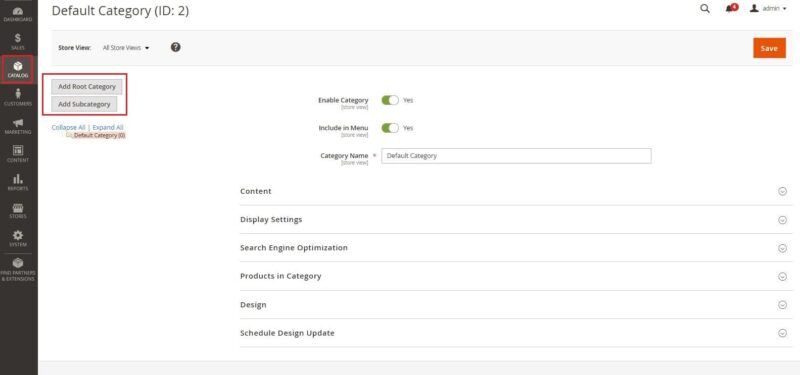
Magento allows you to manage categories in the “Catalog” → “Categories“.
Marketing
Each merchant in the admin panel has a “Marketing” tab that gives access to tools that manage promotions, SEO, etc. The main sections are:
- Promotions – offering promotions and discounts to customers when certain conditions are met,
- Communications – consists of emails, newsletters, social media feeds, etc.,
- SEO & Search – using relevant keywords in descriptions, managing metadata, etc. data, and creating a site map,
- User Content – User content that creates a sense of community and increases sales, e.g. reviews, product reviews,
- Customer Engagement – create automated engagement campaigns such as personalized emails.

Magento also allows you to configure your store with Google tools that help you optimize your content and analyze your traffic. Examples of solutions are Google Analytics, Google AdWords and Google Tag Manager.
Magento gives a large array of possibilities to merchants who need a flexible platform for their stores. Additionally, novice users can count on detailed tutorials on how to handle every step of the configuration. Unfortunately, the wide range of advantages of this platform comes with high system requirements, which not every seller can meet. According to customer feedback, Magento is the ideal option for large stores.
Check out our other e-commerce articles: WooCommerce Pricing: 7 Costs To Consider!
You can also stay in touch and join our Facebook community!
Author: Martin Sparks
E-commerce enthusiasts which constantly digs around the internet in order to make sure he hasn’t missed any important information on the topic of starting and scaling profitable online stores.

