PrestaShop offers an open-source solution that allows great freedom when creating your online store. The platform is already used by over 300 thousand merchants. If you are wondering how to create a PrestaShop store, read our article.
PrestaShop Store -table of contents:
- Hosting
- System requirements
- Installation
- Maintenance mode
- Language selection
- Taxes
- Templates
- Terms of sale
- Adding products
- Payments
- Shipping
- Modules
- PrestaShop Essentials
- Marketing
Hosting
Hosting is an essential element for creating an online store. PrestaShop on its website has an offer of hosting companies with which it cooperates. Among them is 1&1 IONOS. Using their offer, the merchant can install PrestaShop as a Click&Build application. The hosting package recommended by the company is 1&1 Unlimited on Linux, which is priced at $5 per month.
System requirements
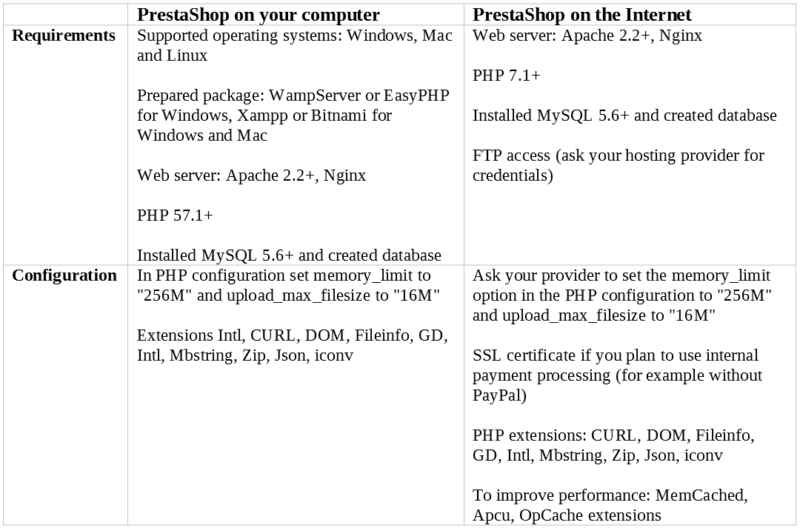
PrestaShop allows you to install the software on your computer or online. Depending on which option a merchant chooses, they will be subject to different system requirements as shown in the table below.
Installation
PrestaShop has prepared a guide on how to install the software. It is available in English at this link. The entire installation process is divided into 6 steps:
- Downloading and unzipping the PrestaShop package,
- Create on your web server, a database for PrestaShop shop,
- Upload three PrestaShop files (including the .zip file) to your chosen location on the web server,
- Run the installation script,
- Follow the instructions that appear on the installer screen,
- After the installation is complete, for security reasons, delete the “install” folder and create a new “admin” one.
Maintenance mode
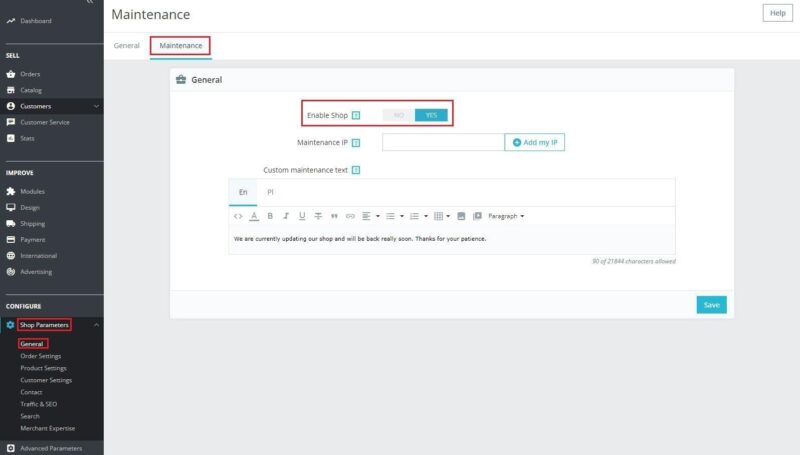
Use maintenance mode to calmly make changes in your e-shop, without fear that some user will enter your unfinished page (or even purchase a product e.g. at an undervalued price). To enable this mode, select the “Shop Parameters” → “General” tab in the admin panel. To disable this mode, select “Shop Parameters” → “General“, then at the top of the window, go to the “Maintenance” tab and press “no” next to “Enable shop“. In the field “Custom maintenance text“, it is worth entering information about introduced changes and when the shop will probably be active again.
Language selection
Sellers who plan to sell not only domestically, but also abroad, should go to the “International” tab -> “Localization“. Here they can adjust the appropriate language and currencies, as well as check whether the system has entered the data concerning units, weight, etc. correctly.

Taxes
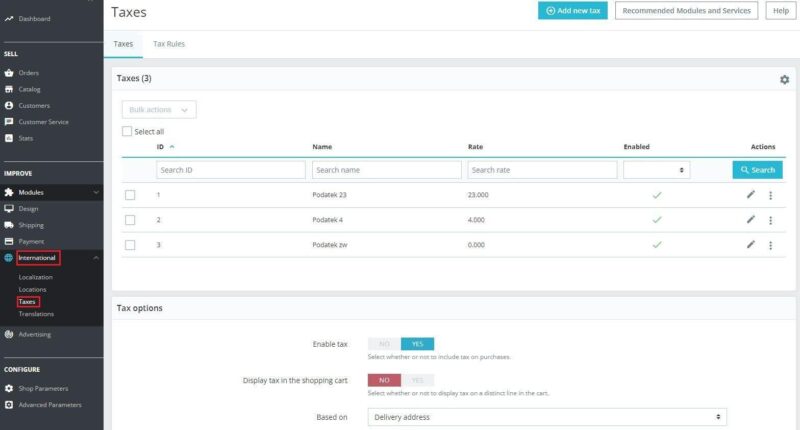
The vendor can configure tax rates and rules in “International” → “Taxes“.
Templates
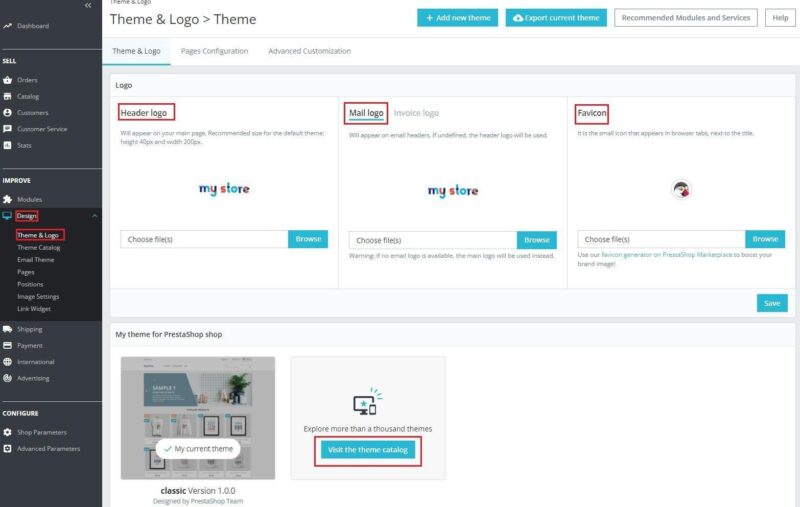
Each vendor after the installation has an automatically set up shop template, which should be enough to start with. However, it is possible to change it in “Design” → “Theme & Logo” → “Add new theme“. The “Design” tab” → “Theme & Logo” → “Add new theme“. The template can be uploaded via .zip file (if it is on the computer), uploaded from FTP or imported from the net.
In the same tab, you can change the store logo and favicon, as well as the logo that is visible in emails to customers.
Terms of sale
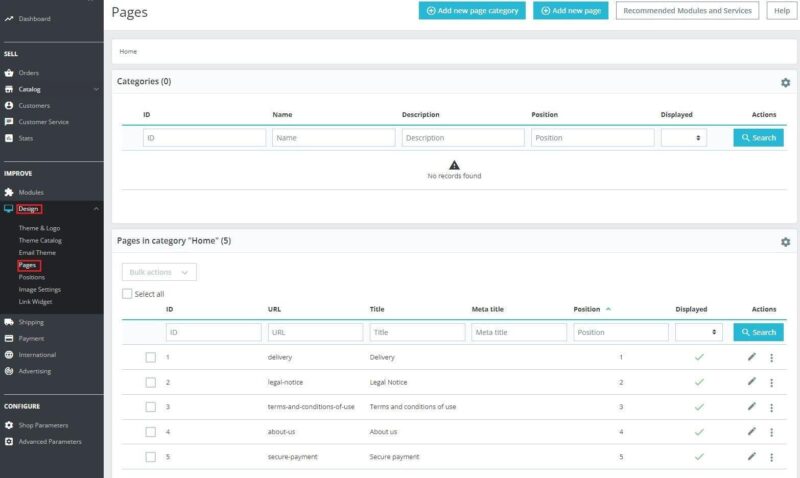
Terms and conditions of sale are documents that contain information about your purchases. These include: privacy policy, terms and conditions for returns and complaints, store rules, etc. Such documents should be added under “Design” → “Pages“.
Adding products
To add a new product, go to “Catalog” → “Products” and in the top right corner, choose “New product“. In the window, enter the data related to the product, such as name, description, category, photo, price and quantity.

When adding products, think about the structure of categories (and subcategories). Well-considered arrangement may help the customers make purchases in an easier way. Also, try to organize product description well. It should contain keywords and information the customers will be looking for.
Payments
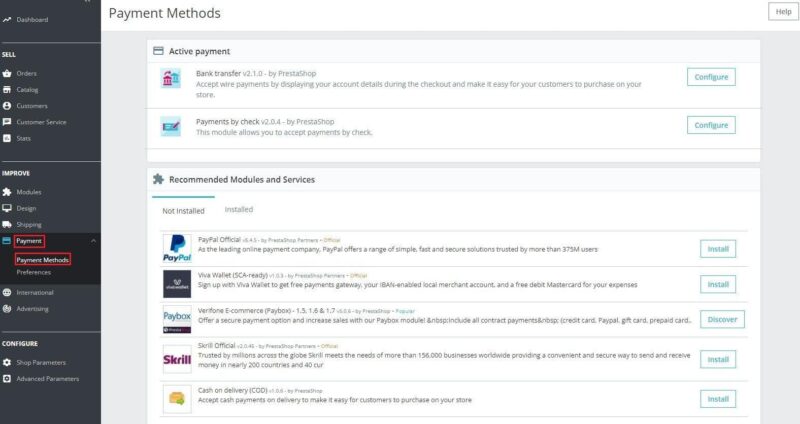
In the tab “Payments” → “Payments method” displays all installed payment options and a list of possible modules to install. Some providers offer free integrations with PrestaShop, such as Paypal.
Shipping
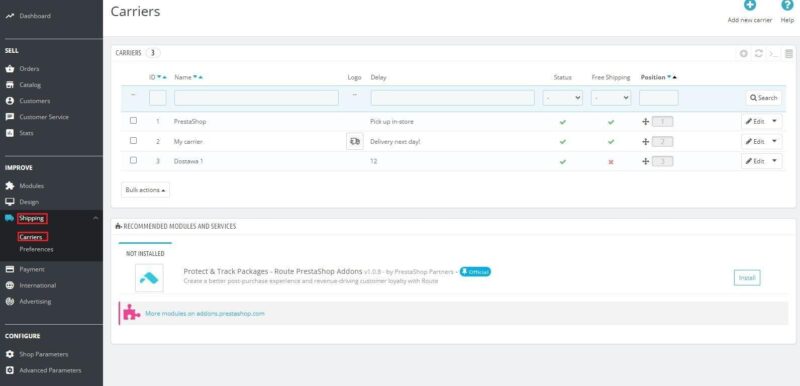
All data related to the delivery can be configured in the “Shipping” → “Carries” tab → “Carries“. Some companies offer free integration with PrestaShop, such as: DHL. Additional costs should be paid if the seller depends on other forms of delivery, e.g. InPost or UPS.
Prestashop – Modules
Modules and plugins offer additional features and elements to help you run your store. Some of them are free, and for the rest you need to pay extra. You can find all modules on the PrestaShop store page at this link.
The merchant can install the plug-in from the administration panel by going to “Modules” → “Module Catalog“.
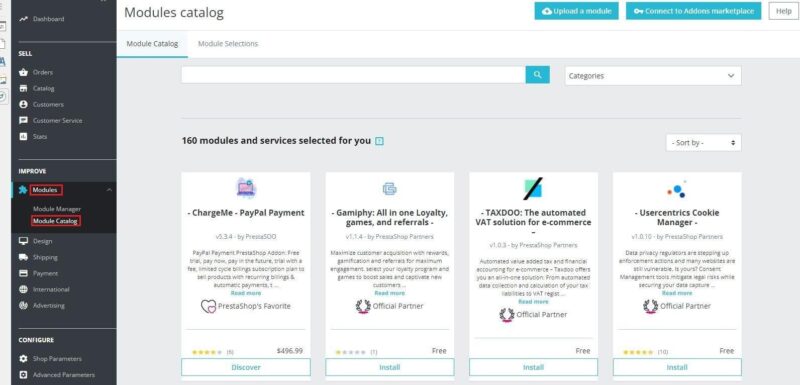
If a merchant would like to manage already downloaded modules, they can do so from Module Manager.

PrestaShop Essentials
PrestaShop Essentials is a turnkey package designed to help merchants with increasing sales and growth. It covers 3 areas: marketing, payments and performance analytics. The package consists of the following modules:
- PrestaShop Facebook
- PrestaShop Checkout built with Paypal
- PrestaShop Metrics
By combining these three ingredients, the merchant has the ability to promote their products on Facebook and Instagram, customize payment methods to their customers, and rate their performance.

Marketing
A seller, using the right plugins, can promote their store in several ways:
- Newsletters and emails – Creating personalized emails is possible with the free MailChimp plugin. It also provides you with detailed reports on your campaigns,
- Promotions, discounts – offering customers discounts can encourage them to buy more products. The paid plug-in “Promotions and discounts (3×2, discounts, offers, packs)” prepares special promotions for customers, e.g. for the first purchase or based on order history,
- Cross-selling and up-selling – is offering customers complementary or better quality (often more expensive) products,
- SEO – search engine optimization, through the use of keywords, can make your store more visible.
Create a PrestaShop store has its advantages and disadvantages. In order not to pay a specialist for the installation and configuration, it is worth having basic knowledge of computer science to avoid problems from the technical side. Certainly a big advantage of this solution is the flexibility and wide range of options it offers to its users.
Check out our other e-commerce articles: How to manage orders and shipping on Etsy?!
You can also stay in touch and join our Facebook community!
Author: Martin Sparks
E-commerce enthusiasts which constantly digs around the internet in order to make sure he hasn’t missed any important information on the topic of starting and scaling profitable online stores.

